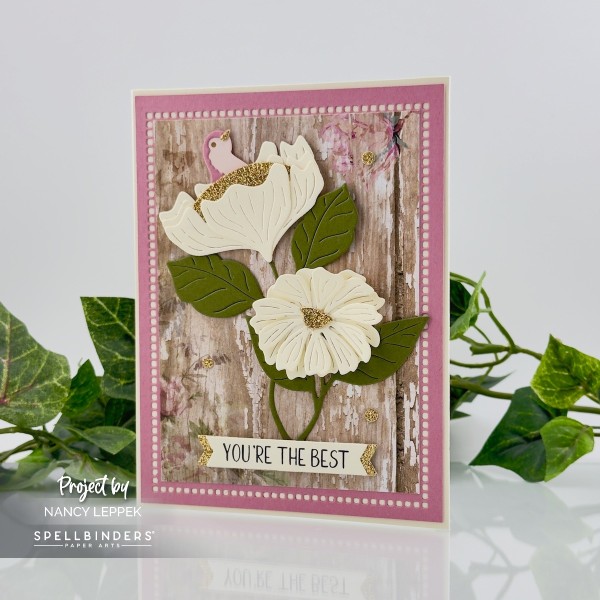
Scrapper@heart

Color my world with family, friends and some time to be creative making cards!


6 Comments

Hitched

Hello, I needed to take a bit of a crafty break as my mojo was missing, so I decided instead of wasting my free time I would organize all my Spellbinders dies along with all the new supplies I have won and or purchased over the last year or so. The pile was getting so out of hand. It was quite the job and it always feels good once it is done. I wish I could say that every stamp set/or die set that I own is repackaged and labeled but I can’t. I would say I am about 85% done, and that isn’t too bad. Maybe this summer I will tackle the rest. We shall see!

Onto the card…I needed some wedding cards for the store so that is where I began. I had yet to open my new-to-me Spellbinders Sunday Drive set along with the Hitched Die set, which happens to be on sale right now, and I knew they would make a fun card. I find putting things with many pieces together can be very time-consuming but so relaxing at the same time. Do you?

I have all the products linked for you below!

Card Details: with Affiliate Inks

Sunday Drive

Hitched

Spellbinders 6

Bearly Art Precision Craft Glue

White Foam Squares-Mix

Mirrored Silver Cardstock

I was going to leave the background completely white but decided at the last minute to make a road with my Hearts Honey Bee Stamps stencil. After I was done sponging, I got the idea to make the road more defined with thin white strips of paper and I think it really helped. I used plenty of dimensionals and a bit of sequins to finish it off. I think the mirrored paper really brings this card to the next level and the cans behind the car might be my favorite part.

I am linking up with Darnell over at NBUS!

Thanks for coming by! I hope you have a great day and find some time to get crafty too! Nanc’


14 Comments

Sending Birthday Wishes

Hello, I am back today with a card for the latest Topping at Seize the Birthday. Linda is our fabulous hostess and she has asked us to make a card for a child. I was asked by a neighbor of mine to make a card for her 12-year-old grand-daughter who loves to bake. I thought my MFT cupcake dies would do the trick.

Card Details: MFT- Cupcake Dies and Watercolor Wash Stencil. The Heart stencil is from Honey Bee Stamps. The greeting is foiled and from Spellbinders-Mini Everyday Sentiments. I used a bit of Copics to color and mirrored paper for my cupcake liners. The tiny hearts are a punch and a die that I keep on my desk 24/7.

I hope you come by Seize the Birthday and check out the cards by the DT and our Two Surprise Party guests! We have Hilary Wright joining us for the next two months and Deborah Wheeler is our one-time guest, as she was the winner of our last challenge. Welcome Ladies!

Take care and happy creating, Nanc’


3 Comments

You Brighten My Day

Hello, I hope you are doing well. I am back today with another card in a different colored background using the Scroll Label Hot Foil Plate. I think pink and silver is one of my all-time favorite color combos, throw in some lilac and white and you have a winning combination, in my opinion. I combined the intricate plate with the Four Petal Bloom Reflection which is also very pretty and easy to put together. I have also used Spellbinders-Mini Everday Sentiments for my greeting. I have everything linked up for you in multiple places if you care to take a look.

Taking photos continues to be a struggle for me some days, throw in foil, and boy oh boy it’s nearly impossible. This card is really quite nice in real life.

Card Details: with Affiliate Inks

Four Petals Collection

Scroll Label Hot Foil Plate

Spellbinders 6

Glimmer Hot Foil System

Glimmer Hot Foil Pack

I certainly appreciate you coming by and I hope you have a wonderful day, Nanc’


9 Comments

A Note to Lift Your Spirits

Hello, I hope you are having a good day. I am here today with a card that was made just for me and no particular challenge. Sometimes it’s good to just play with no perimeters and or guidelines and let the creative process go wherever it takes you.

Card Details: I just adore this Floating Bunny die set from Spellbinders and I thought she would look perfect in front of this fun stencil that I also really LOVE from Miss Ink Stamps. The stencil set is called-Cloud Hearts. Instead of finishing off the clouds with ink and a stencil, I chose to keep the heart in the middle as my focal point. I thought the bottom of the card looked a bit bare, so I decided to use the MFT Stitched cloud die to tie it all together. The sentiment I chose is from the Tweet Hello set, that’s also from MFT. The banner die is from Pink and Main. Instead of using a white gel pen to add highlights to my heart balloons and ruining it…LOL, cause I know I would, I thought, why not use the inside of the bunny ear and a Holly die. I LOVE how it worked out. I will be doing this from now on. The strings are made from gold paper. I used Oxide inks Worn Lipstick and Kitsch Flamingo to blend my heart clouds.

You are in luck! The floating bunny is on sale right now! You can find it HERE!

I certainly appreciate you coming by, I hope you find some time in your day to be creative.

Take care, Nanc’


6 Comments

Handmade for You

Hello friends, I am back today with my 3rd card using this fun new set from Simon Hurley and Spellbinders. This time I decided to use just the rose stamp in the set and try my hand at watercolor- the cheaters’ way. What is the cheaters’ way…you might ask? In my opinion, it’s when you heat emboss the image so that it makes it easier to color inside the lines. It’s the only way you will see me doing it, that is for certain! I must say that I totally enjoyed the process. I know it has flaws and some of the shading is probably in the wrong place because of the light source…blah blah blah…but to me, worrying about all of that takes the joy away. I just wanted to relax and enjoy the process and that is what I did.

After I was done with the water coloring, I couldn’t decide on what I wanted to do for the background. Hubby suggested I used the foil plate-Sealed Geometric Flowers, he really thinks it’s awesome, and so do I. Now that it’s on the background, do you think it’s too busy? I am on the fence. The foiled Handmade For You greeting is from Spellbinders as well. I have links for you below. I decided to take this photo outside in the sun in front of my Florida Flame Vine and see if I could capture the foil a bit better.

Affiliate Links Below:

Butterfly Kisses

Sealed Geometric Flowered Background

Mini Everday Sentiments

Glimmer Hot Foil System

Spellbinders 6

I hope you have a terrific week, and some time in the mix of all things to do with Life, you find some time to be creative!

Take care, Nanc’


9 Comments

Just Because

Hello, I am back today with another card featuring some products from Spellbinders, two are brand new and one is a little bit older. I needed a bit of an escape on Tuesday and was on break from sitting with my dad, so decided to make a card. I wanted to try foiling again and this time I foiled my background using the New Geometric Optical Hot Foil Plate. It is such a fun pattern and once again it worked like a charm. If you haven’t tried photo paper for foiling, give it a try, it works really well for me. I have been wanting the Bouquet of Flowers die from Spellbinders for so long and when I saw it was on sale a few weeks ago, I just couldn’t pass it up. If you ask me it’s a must to have in your arsenal, and by the way, it is still on sale.

Here is a close-up.

I chose to use Christmas colors for my card as I was going to make this a Christmas card and play along with the Sunday Stamps Challenge, but in the end, opted to use a sentiment that I had already foiled and laying on my desk. I am still linking up with them as it’s a color challenge and Christmas is not required, you just have to use at least three colors.

Below I have links for all the products I used on this card and a few details on how this card came together.

Affiliate Links Below:

Geometric Optical Background

Sealed Glimmer Sentiments

Bouquet of Flowers

Fluted Classic Ovals

Spellbinders 6

Glimmer Hot Foil System

Card Details: After I foiled my background and sentiment I decided to also use foil paper for my bouquet holder. My gold paper is only one-sided so I cut out 2 and glued them together. I had hoped to have no white showing once I folded it, but it didn’t go perfectly as planned. I think in hindsight, I should have scored both panels before I glued them together. It looks okay in the end, and just imagine that it’s white tissue or something like that. Next, all I had to do is cut out my flowers and foliage. The die set comes with a bow, but I opted for a gold stiff ribbon I had in my stash. It tied it all together perfectly. I chose to hot glue this card together as I wanted to be sure nothing came off in the mail. Both the oval and the sentiment have either foam or dimensionals under them.

This card looks really pretty in real life and is a tad hard to photograph.

Thanks for stopping by and I hope you have a wonderful day! Take care, Nanc’


2 Comments

Home Sweet Quilt

Hello, Today I am sharing a card with you that is part of the new Home Sweet Quilt Collection from Spellbinders. I have used pieces of the Filligree Eight Point Star Collection to make my card. This set was designed by the talented Becca Feeken. I have paired my card with another Spellbinders set, Noel, as I wanted to make a Christmas card. I really love how this came together, just like I envisioned.

Affiliate Links Below:

Platinum 6

Filligree Eight Point Star

Noel Etched Dies

A Few Card Details: First, I blended my background with 5 colors of Oxide Inks. Next, I decided to pull out my Snowflake EF by Cuttlebug and give the background a little interest, later to realize that I embossed the wrong side of the paper. UGH! I decided, to forge ahead as it didn’t look so bad de-embossed after all. Plus, it was easier to get all my dies to adhere to a flatter surface. Last, it was time to assemble all the dies. The small snowflakes in the center of my Eight Point star are from the NOEL set as well. I doubled the Noel letters in white to tie the card altogether. In the end, I really love the way this card turned out!

I will be linking my card up with Darnell over at NBUS as the Home Sweet Quilt Collection is brand new.

I will be back in a day or two with another card using this collection.

Update on my dad, he is hanging on and we don’t know why. It breaks my heart to see him suffering so. I adore him!

I hope you get to do something today that brings you joy, Nanc’


16 Comments

A Little Message to say-Hello

Hello– I am back today with my very first card using foiling…You can gasp, it’s okay! I just bought my Glimmer Hot Foil system from Spellbinders and today is the first chance I have had to use it. I have never been the type of person to jump on any type of trend until I am sure it’s going to stick around for a while, and from the looks of things, foiling isn’t going anywhere anytime soon.

Beginner’s Luck-After I peeled back the foil on my very first attempt and it came out so well, I was hooked immediately. I then proceeded to kick myself for waiting so long. My hubby would say…”Better Nate than Lever.” LOL, He is always Mr. funny/goofy guy!

The Geometric Flower Background looks fabulous in gold foil, don’t you think? There is also a layering stencil set for easy coloring, which was quickly added to my Christmas list this morning. The rest of this card was also made with Spellbinder’s products and I have them linked for you below. The Sealed Glimmer Sentiments are also new to me and are just fabulous and come with 11 fantastic sayings.

Affiliate Links Below:

Sealed Collection

Sealed Geometric Flowered Background

Sealed Glimmer Sentiments

Outlined Sentiments

Fluted Rectangles

Spellbinders 6

Glimmer Hot Foil System

Card Details: After I foiled the Geometric background I decided to cut it into four quadrants for added interest. Next, I cut out the rest of the dies (Linked above) with white and gold paper and foiled my greeting. I had not intended on putting the small Fluted Rectangle black die-cut as part of my layout, but I felt there was too much white, and the flowers and sentiment needed to be grounded. If you look closely I doubled the small flowers with gold paper and I like how that turned out. I have dimensionals on the round greeting for extra height and to hide the stems of my flowers. The Hello is from the Outlined Sentiments (one of my favorite sets) and is cut out of gold and black paper.

If you haven’t tried foiling I definitely think you should add it to your Christmas List. I have linked up all the fun products from Spellbinders that I used above.

In other news…My father has been under hospice care since the day after Thanksgiving. Losing my mom to cancer when I was 30 was hard enough, and we took care of her at home until the end, but this is ten times worse when there is severe dementia involved. It’s a huge rollercoaster of emotions as every day is different with a new battle in front of us. He could last another week, a month, or longer, we just don’t know. It is heart-wrenching to see him suffer any longer.

I am linking up with Darnell over at NBUS.

It may have taken me a week to make a card and write this post, but it’s good for me to get lost in something else, even if it’s just for a little while.

Take care, Nanc’


8 Comments

Thanks

Hello, I hope you are doing well today. I have another card for you using three fun Spellbinder products. As you know I am a bit hooked on the Gingko die but let me tell you that this Embossing Folder is something special too. It is called Loops and it is so pretty, especially in white. It just so happens to be 1/2 price right now! The sentiment die is also linked for you below and I find myself reaching for it time and time again, that there is no point putting it away.

Affiliate Links Below:

Sealed Collection

Loops Embossing Folder

Sealed Gingko Etched Dies

Outlined Sentiments

Spellbinders 6

Card Details: I was inspired by the sketch over at Freshly Made Sketches to begin my card, and I am so glad the chores were done and I had time to play along. As you may have noticed I sponged my paper with various colors of Oxide inks before die-cutting, I did the same with the outline to the sentiment. Added a few gems and I was done. Easy peasy!

Thanks for coming by and I hope however you spend the rest of your week, you do something that brings you joy! Nanc’


5 Comments

Thanks

Hello, I am back today with an elegant looking Thank you card using part of the Sealed Collection release over at Spellbinders. I told you a few posts ago that I was smitten with the Gingko die in this collection, so here it is once again. This time I used the Thanks from the Spellbinders Truckin Through the Seasons for my sentiment. I seem to be in a use-up some DSP that you have in your stash kinda mood lately and this paper is just gorgeous. I don’t think you can tell but it’s covered in cream, tan, and taupe roses. I got it at my local scrapbooking store ages ago and sadly don’t know whose it is. Also, pretty proud of myself for tying a decent bow, if you know me that is certainly not something I am good at.

I don’t think this card needs much explaining, and I have all supplies linked down below!

Affiliate Links Below:

Sealed Collection

Sealed Gingko Etched Dies

Truckin Through the Seasons

Spellbinders 6

I also am joining the Tic Tac Toe Challenge and I have selected the center column of Thankful sentiment, Free, and Any Color.

Your visits and sweet comments certainly brighten my day and for that I thank you! Take care and happy creating, Nanc’